I’m pleased to announce that Mr. Leon Baumgardt of the L•Camera Blog has kindly featured my work in his “Made with Leica” series.
I wish to thank Mr. Baumgardt for this honour.
—Peter | Prosophos.

I’m pleased to announce that Mr. Leon Baumgardt of the L•Camera Blog has kindly featured my work in his “Made with Leica” series.
I wish to thank Mr. Baumgardt for this honour.
—Peter | Prosophos.
[See also: My Photography Workflow, Parts 1 and 2]
–
Inspiration is easy to explain, at least on a colloquial level.
Simply stated, inspiration is the spark that ignites our need to create.
Most of us first get the “spark” to photograph because we are emotionally moved by something. It might be the birth of our first child, or the breathtaking scenery of some unblemished place. It might be an infinite number of things (good and bad) and they all represent stories we want to tell, and we — through our images — are the storytellers.
Inspiration provides motivation, purpose, and focus. We can certainly produce compelling images without it but we’re making it more difficult for ourselves when we do. This is especially true at the novice stage, but it remains true even after we’ve gained a high degree of technical proficiency.
Photographing with inspiration also facilitates an Infusion of Self (discussed in the next section) into our work. We look, we see, we are moved. Everything that follows is our attempt to communicate — through iconography — that which has resonated within us.
Consequently, I always look for inspiration and try to photograph whenever the “spark” ignites me; often, this happens when I’m observing Life’s Little Moments.
Want to find a good starting place for your photography?
Find something that emotionally moves you and point your camera in that direction.
—Peter | Prosophos.
[See also: My Photography Workflow, Part 1.]
–
You will notice that, on this site, I almost always write about people “creating” or “making” images. Occasionally, I refer to people “capturing” them. What you won’t see is any comment from me about somebody “taking a snap”.
Why?
I believe that good photographic output requires effort. Most of us who are serious about this craft choose to share images with the world that we are proud of, that we have created through some type of process requiring our mental and physical exertion. I therefore choose my language accordingly. This may seem trivial — a question of semantics, perhaps — but for me the distinction is important. To call somebody else’s work a “snap” is almost as bad as complimenting the image and then saying to him/her: “You must have a good camera!“.
Simply put, consistently pleasing images are, created, not randomly “snapped”. Of course, one may by sheer luck produce a good image and even a work of photographic art, but it won’t happen consistently unless you know what you’re doing.
In a sense, I’m preaching to the converted by writing the above because most people reading this have previously engaged in some sort of struggle to produce a good image and already intuitively understand the effort that is involved. However, some of you may not realize that, in addition to expending effort, you engage in a process, and therefore may miss opportunities to improve it so that you may achieve consistently good results.
So, what sort of thought process do I engage in when creating an image? What are the things that I look out for?
–
Essentially, I keep five things in mind:
–
–
The above is presented in the temporal sequence — more or less — of how I consider things, though of course some overlap occurs. I’ve tried to be clever by using words that begin with “I”, so a few of these may not be very transparent at first glance.
Do I check off these items with pencil and paper when I’m out photographing?
No, of course not. This simply represents the framework of my workflow* and encompasses my impetus for seeking to photograph, my thought process while photographing, and my strategy for improving my photography. Most of this process occurs on a subconscious level. Over time, however, I’ve become more aware of the elements in my workflow and have learned to readily recognize them when they present themselves and fine-tune them when I can.
—Peter | Prosophos.
–
[*Note that this workflow does not address post-processing, which is essential in realizing the full potential of any given image. That’s a whole other topic that is beyond the scope of this discussion. Moreover, it’s a topic that does not lend itself well to written tutorials. Having stated that, a boring image will remain boring after post-processing, so it is important that you get things right from the start — or at least get it right just before you click the camera shutter.]
I’m starting a series of posts discussing my thought process when creating photographic images. I’m hoping it will be of help to those of you who are just beginning your photographic adventures, and also to those of you who are more experienced but wish to compare notes. The idea for this arose last year when I was asked to discuss my images during the Leica Akademie workshop in Toronto.
I know many of you aren’t necessarily able to attend a Leica workshop and most of you aren’t able to travel to Toronto for a One-on-One Teaching session with me, so I thought presenting this information on my website, though not ideal, would at least make it more accessible.
Before I begin, I’d like to emphasize the following:
This is a work-in-progress, both literally and figuratively. In the beginning there will be gaps between sections, because I won’t be able to write them all in one sitting. As time passes, and as sections are completed, I’ll likely be updating and expanding each of them by adding more commentary, examples, and images. Hopefully as I learn, I’ll revise. I’d like the content to eventually strike a balance between being comprehensive and remaining practical.
With that in mind, the next post will be an overview of my five considerations, my “workflow” for creating photographic images.
—Peter | Prosophos.

↑Leica M9 and Leica 50mm Summilux ASPH @ f/1.4.
Face painting.

↑Leica M9 and Leica Noctilux @ f/0.95.
How did I process the film for this image? You can access my simple 3-part tutorial here.
The film was subsequently scanned to digital with a Plustek 7600.

↑Leica M2, Ilford HP5+ 400, and Leica 50mm Summilux pre-asph @ f/1.4.

↑Leica M9 and Leica Noctilux @ f/0.95.
The handiwork of an English babe I know.

↑Leica M9 and Leica Noctilux @ f/0.95.
What a difference a year makes…
—Peter.
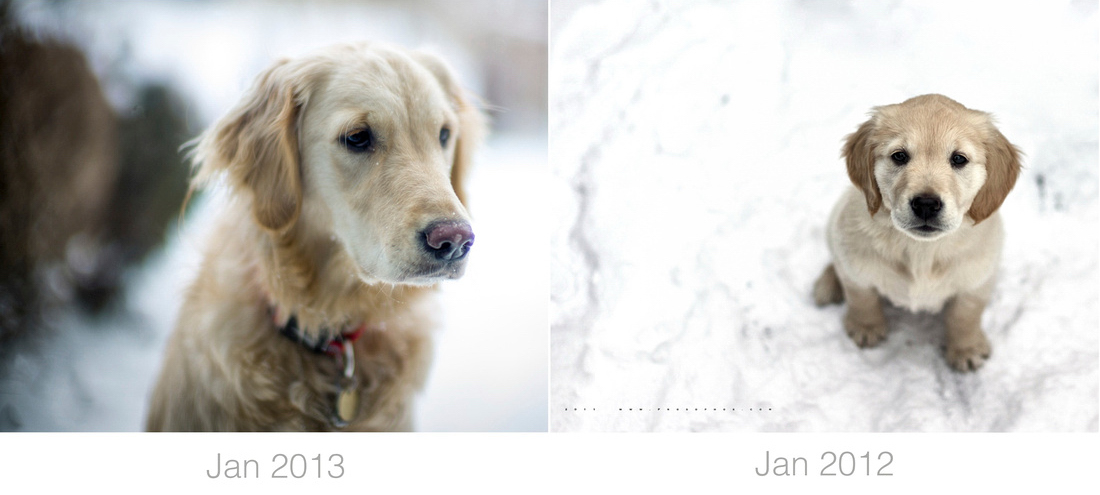
↑Leica M9 and Leica 50mm Noctilux @ f/0.95 (left), and Leica 35mm Summilux FLE @ f/1.4 (right).
(I couldn’t resist posting one more image for this year…)
It’s Christmas Eve, the kids are finally asleep, and the fire is almost out.
Old St. Nick is near.

↑Leica M9 and Leica 21mm Summilux @ f/1.4.
Wishing everybody a wonderful 2013.
See you next year!
—Peter.

↑Leica M9 and Leica 50mm Summlux ASPH @ f/1.4.

My good friend Raaj has just posted some sample images on his site from the new Leica M (240).
As regular readers of my site know, I’ve posted extensively about CCD vs. CMOS sensor rendering at base ISO. Notably, I’ve expressed concern that the move to a CMOS sensor in the new M(240) would equate with a loss in image quality at base ISO, while there would be gains made in high ISO photography, and in movie-making.
Are my concerns well-founded? I don’t believe that question can be answered for certain based on web-sized images, but I’ll let you be the judge. Incidentally, Raaj tells me he will try to post some scenes that were shot with both the M9 and M(240), using the same lens. That will be most interesting to see.
—Peter.
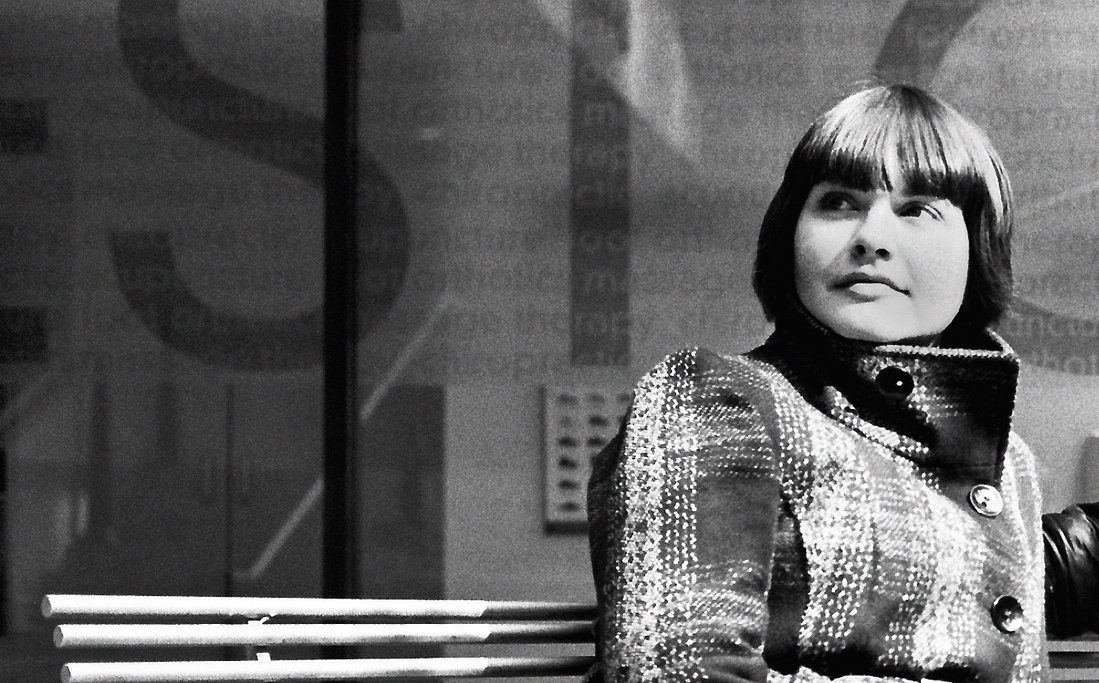
↑Leica MP, Voigtländer Nokton 40mm, and Fuji Superia X-tra 200.
For anyone in doubt about film having a different look from digital, look carefully at this image.
Noteworthy observations: the colours, the tonality. There are other differences that I’ve never been able to put my finger on — call it the “je ne sais quoi” factor.
As an aside, I’ve always found that the Voigtländer Nokton 40mm, the lens used to capture this image, performs exceptionally well on film.
—Peter | Prosophos.

↑Leica MP, Voigtländer Nokton 40mm @ f/1.4, and Fuji Superia X-tra 200.

↑Leica MP, Voigtländer Nokton 40mm, and Fuji Superia X-tra 200.
I went from debating whether to keep the Noctilux f/0.95 to realizing it’s now my favourite lens.
If you can live with the headaches of ownership, you’ll find it’s a masterpiece.
—Peter.